How to Build a Simple Bookshelf Using Only Hand Tools
This guide walks you through building a sturdy, beginner-friendly bookshelf using hand tools only. It’s designed so you can make straight, strong joinery without power equipment—using measuring tools, hand saws, chisels, planes, clamps (highly recommended), and basic hardware.
Overview (What You’ll Build)
A practical bookshelf typically consists of:
- A top and bottom frame (rectangular “rails”)
- Side panels (two pieces)
- Vertical shelves spaced evenly
- Back panel (optional, but strongly recommended for squareness and stiffness)
Recommended size (example)
- Height: ~60 in (152 cm)
- Width: ~30 in (76 cm)
- Depth: ~12 in (30 cm)
You can scale the dimensions up/down, but this size keeps parts manageable with hand tools.
Materials & Cut Plan
Wood choices
Pick straight boards with minimal twist.
- Shelves/frames: hardwood or plywood-backed boards (solid wood looks great, plywood can be more stable)
- Back: thin plywood or hardboard (1/4 in / ~6 mm)
Hardware (if you prefer sturdiness without complicated joinery)
- Wood glue
- Pocket screws are not “hand tools only” in the strictest sense if you use a drill, so instead use:
- Wood screws driven by hand (slow, but doable), or
- Dowel joinery, or
- Mortise-and-tenon (best strength, most handwork)
Joinery approach (recommended)
For a first build with hand tools, use dado + rabbets or dado + glue:
- Cut grooves (dados) for shelves to slide into
- Cut simple rabbets for the back panel
- Use glue + optional wooden dowels/hand-driven screws at corners for extra strength
Tools Checklist (Hand Tools Only)
You’ll want:
- Tape measure + speed square or try square
- Pencil + marking knife (or just pencil)
- Hand saw (crosscut saw and/or rip saw)
- Chisel set (at least 1/4“ and 1/2”)
- Mallet (wood or rubber)
- Wood plane (optional but helpful for flush fits)
- Clamps (at least 2; more is better)
- Drill/bit is optional—but if you truly mean no drill, you can skip it
- Sandpaper (or sanding block) and/or sanding boards
- Hammer (for gently adjusting joints)
- Safety gear: eye protection, hearing not critical for hand tools, but still use eye protection
Step 1: Design the Layout & Measure Twice
- Decide shelf spacing:
- Example: 4 shelves total means 5 spaces including top/bottom frames.
- Determine your shelf thickness (e.g., 3/4 in).
- Choose dado depth:
- Common: 1/2 the thickness of the shelf to keep them supported.
- Sketch it.
- Mark the locations of shelves on the inside faces of the side panels.
Tip: If your shelf boards are 3/4 in thick, you might cut a dado that’s ~3/8 in deep and ~3/4 in wide (adjust based on your wood size).
Step 2: Select and Prepare the Lumber
- Ensure boards are as flat and straight as possible:
- Sight along each board for bow/twist.
- Plane edges/face if needed so panels sit clean.
- Cut parts slightly oversized at first:
- Cut long pieces a bit long, then trim to final size after test-fitting.
Step 3: Cut the Frame Pieces
You need:
- Two sides (height pieces)
- Top and bottom rails (width pieces minus side thickness depending on your joinery)
- Optional intermediate rails if your design uses them
Example for simple frame math
If sides are 3/4 in thick and your overall width is 30 in:
- The top/bottom rails should be ~30 in − 2(3/4 in) = 28.5 in if they sit between the sides. If rails sit on the sides, reverse the logic.
Keep one rule consistent: decide whether your top/bottom go between side panels or on top of them.
Step 4: Cut Shelf Dados (The Key “No Power” Strength Trick)
- Mark the dado lines on the inside faces of both side panels.
- Set up your width:
- Use a saw to score the dado walls to the exact thickness/width.
- Remove waste:
- Use a chisel to pare out the groove to depth.
- Test-fit a shelf:
- The shelf should slide in snugly (no force).
Best practice: Cut slightly tight first, then pare down carefully until it’s perfect.
Step 5: Cut the Back Panel Rabbet (Optional but Recommended)
A back panel:
- Helps square the case
- Prevents racking (side-to-side wobble)
- Gives stiffness without complicated joints
- Choose a back panel thickness (often 1/4 in).
- Cut a rabbet on the inside perimeter of the back edges.
- The rabbet should accept the back panel so it sits flush.
If you don’t want to rabbet:
- You can simply fasten the back panel to the rear edges with wood screws.
Step 6: Dry Fit Everything
Before glue:
- Put shelves in their dados.
- Place top and bottom rails.
- Check:
- Are corners square?
- Do shelves sit level?
- Any gaps?
Adjust by trimming dados or planing parts—don’t glue until it’s right.
Step 7: Glue-Up (Build the Main “Box”)
You’ll typically assemble in this order:
- Glue side panels to top and bottom rails (if those rails connect)
- Add shelves after the frame corners are set
- Insert shelves into dados while clamps are ready
Glue tips
- Use wood glue sparingly but thoroughly.
- Wipe squeeze-out while it’s fresh.
- Use clamps to keep the case square.
- Let cure fully (often overnight).
Clamping strategy: Use clamps across corners and diagonally if needed to maintain squareness.
Step 8: Attach the Back Panel
- Slide the back panel into its rabbet (or position it flush).
- Drive small nails/screws by hand into the side/back edges.
- Ensure it sits flat.
Even a simple back attachment can dramatically improve stability.
Step 9: Final Sanding and Edge Breaks
- Sand all faces and edges progressively (e.g., 120 → 180 → 220).
- Break sharp edges:
- Lightly round edges with sandpaper or plane.
- Remove dust with a tack cloth or slightly damp rag, then dry.
Step 10: Finish (Protect and Beautify)
Choose based on your wood and desired look:
- Oil/varnish for visible wood grain
- Paint for a clean uniform appearance
General hand-tool-friendly workflow:
- Apply stain (optional) and let dry
- Apply finish coats
- Lightly sand between coats if needed
Common Problems & Fixes
- Shelves don’t sit fully: dado too shallow—chisel deeper and test again.
- Shelf fits too tight: pare the groove walls or plane shelf edges slightly.
- Case won’t stay square: back panel rabbet fit might be off—re-check markings, then correct with careful chisel work.
- Wobble: ensure all legs are supported and that back panel is securely fastened.
Quick “Beginner Joinery” Variations
If you want to reduce chisel work even more:
- Shelves with simple dado only (no mortise/tenon)
- Sides with grooves + shelves slide-in
- Dowels at corners for alignment (hand-driven dowel pegs are possible but slower)
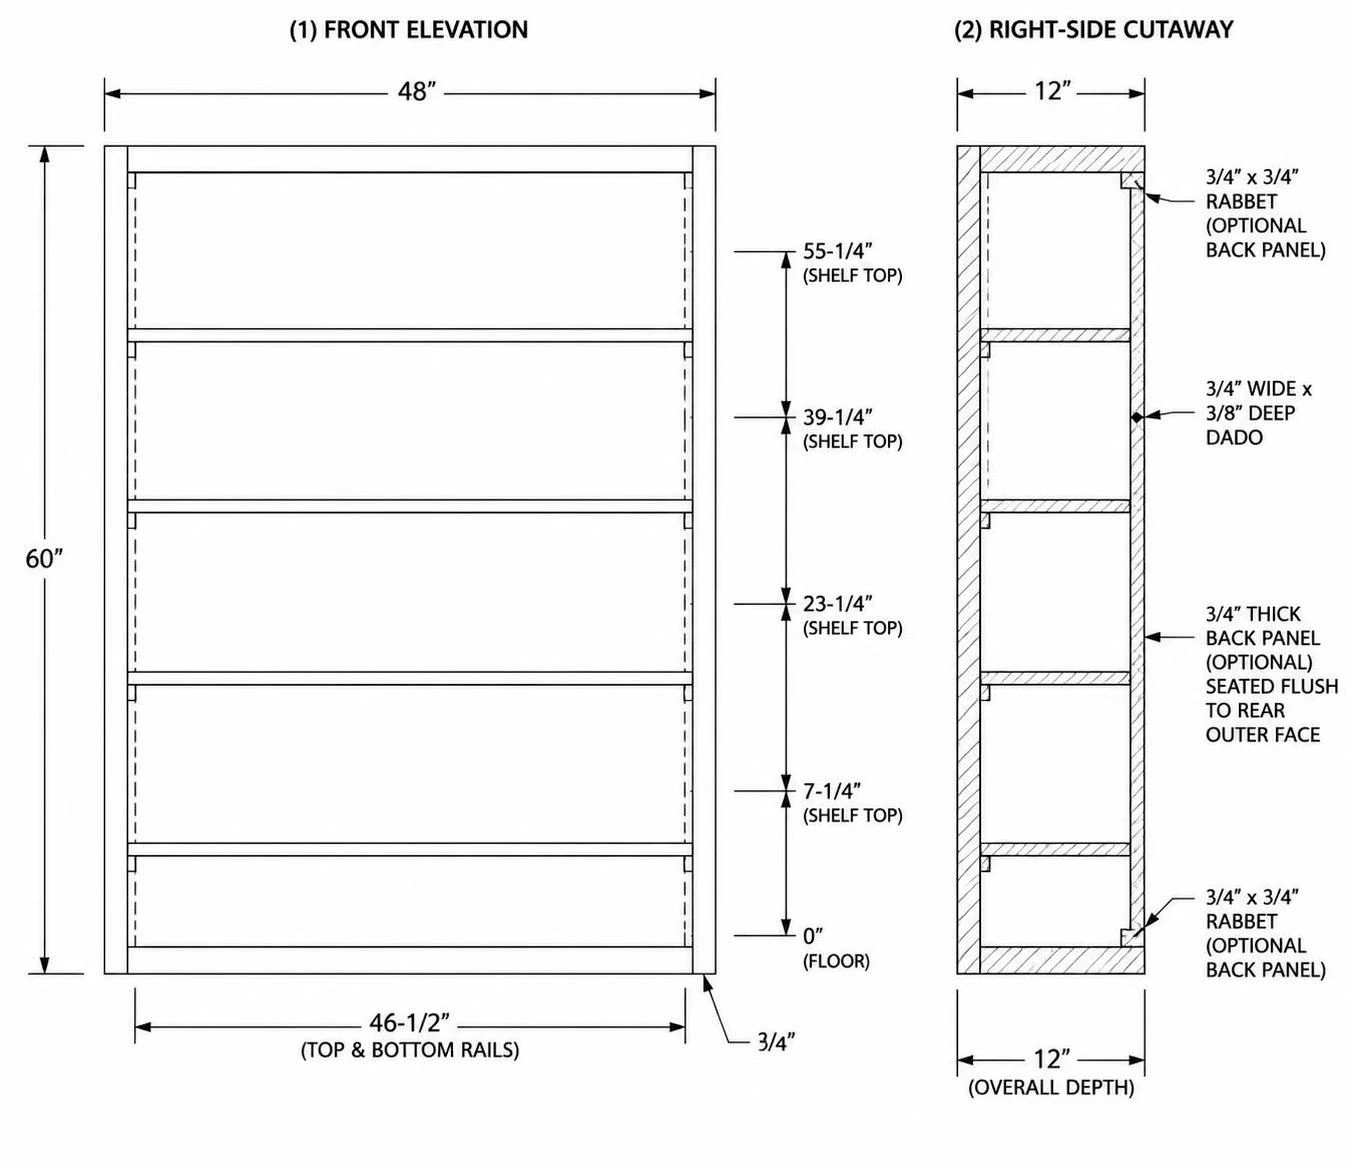
Updated bookshelf plans (48“ wide) — 60” tall, 4 shelves, optional 3/4" rabbeted back
Dimensions (overall)
- Width: 48"
- Height: 60"
- Depth: 12"
- Material thickness: 3/4" (sides, rails, shelves, back)
Cut list (all inches)
Sides (2)
- 2 pcs: 60“ (H) × 12” (D) × 3/4" (T)
Top & bottom rails (2) — fit between side panels
- Side thickness = 3/4" each side, so:
- Rail length = 48“ − 2×3/4” = 46-1/2"
- 2 pcs: 46-1/2“ (W) × 12” (D) × 3/4" (T)
Shelves (4) — slide into dados
- Shelf width: same as rail length = 46-1/2"
- Shelf depth: 12"
- 4 pcs: 46-1/2“ (W) × 12” (D) × 3/4" (T)
Back panel (optional, rabbeted) (1)
- 1 pc: 60“ (H) × 48” (W) × 3/4" (T)
Shelf spacing (4 shelves)
Inside height between the underside of the top rail and top of the bottom rail:
- = 60“ − 2×3/4” = 58-1/2"
Use shelf center spacing for an even, beginner-friendly layout:
- Bottom shelf height (from bottom of case): 7-1/4"
- Then put remaining shelves at about 16" centers
That gives shelf “top-of-shelf” heights (approx, consistent spacing feel):
- Shelf 1: 7-1/4"
- Shelf 2: 23-1/4"
- Shelf 3: 39-1/4"
- Shelf 4: 55-1/4"
Mark these on the inside faces and cut dados accordingly (details next).
Dados in the sides (to support 3/4" shelves)
Recommended dado size:
- Width: 3/4" (to match shelf thickness)
- Depth: 3/8" (captures about half the shelf thickness)
- Depth is measured from the inside face toward the outside.
You will cut 4 dado shoulders on each side panel (one pair per shelf level), at the shelf locations you marked.
How to mark accurately
- Mark the shelf location lines on both side pieces using a square.
- On each line, mark the dado “width” (3/4“) and “depth” (3/8”) from the inside face.
- Score with a saw/knife at the shoulders.
- Saw to the shoulder lines.
- Pare with a chisel to depth, test-fit a shelf.
Fit goal: shelf slides in snugly without hammering.
Rabbet for the 3/4" back panel (captured back)
To capture a 3/4" back panel with minimal play, cut a rabbet on the inside perimeter so the back’s outer face sits flush with the case’s outside back plane.
Rabbet dimensions
- Rabbet width (horizontal): 3/4"
- Rabbet depth (front-to-back): 3/4"
Where to cut
Cut the rabbet on:
- the inside rear edge of both side panels
- the inside rear edge of the top rail
- the inside rear edge of the bottom rail
This creates a continuous “frame” shelf for the back panel.
Rabbet location rule (important):
- The rabbet should start at the back face of the case and go inward 3/4" so the back panel’s thickness seats into it.
Back panel installation
- Slide the 3/4" back panel into the rabbet from the rear.
- Fasten with small wood screws or nails from the outside rear edges into the rabbet/frame members (through the side/top/bottom rails where accessible).
- Ensure it sits flat before fully fastening.
Assembly order (hand-tool workflow)
- Cut all parts to size.
- Cut dados in the sides (4 positions per side).
- Cut the rabbet on the inside perimeter surfaces (sides + top/bottom rails).
- Dry-fit shelves in dados and verify everything is square.
- Glue and clamp top & bottom rails to the side panels.
- Insert shelves into dados (glue only if you want them permanent).
- Slide in back panel and fasten.